 Feedback Bubble
Published 4 August 2026 · By Jonathan Jones
How to Add a Feedback Button to Your Website
A practical guide for indie founders and solo developers on adding a feedback button to their website, choosing the right approach, and turning what visitors say into useful product decisions.
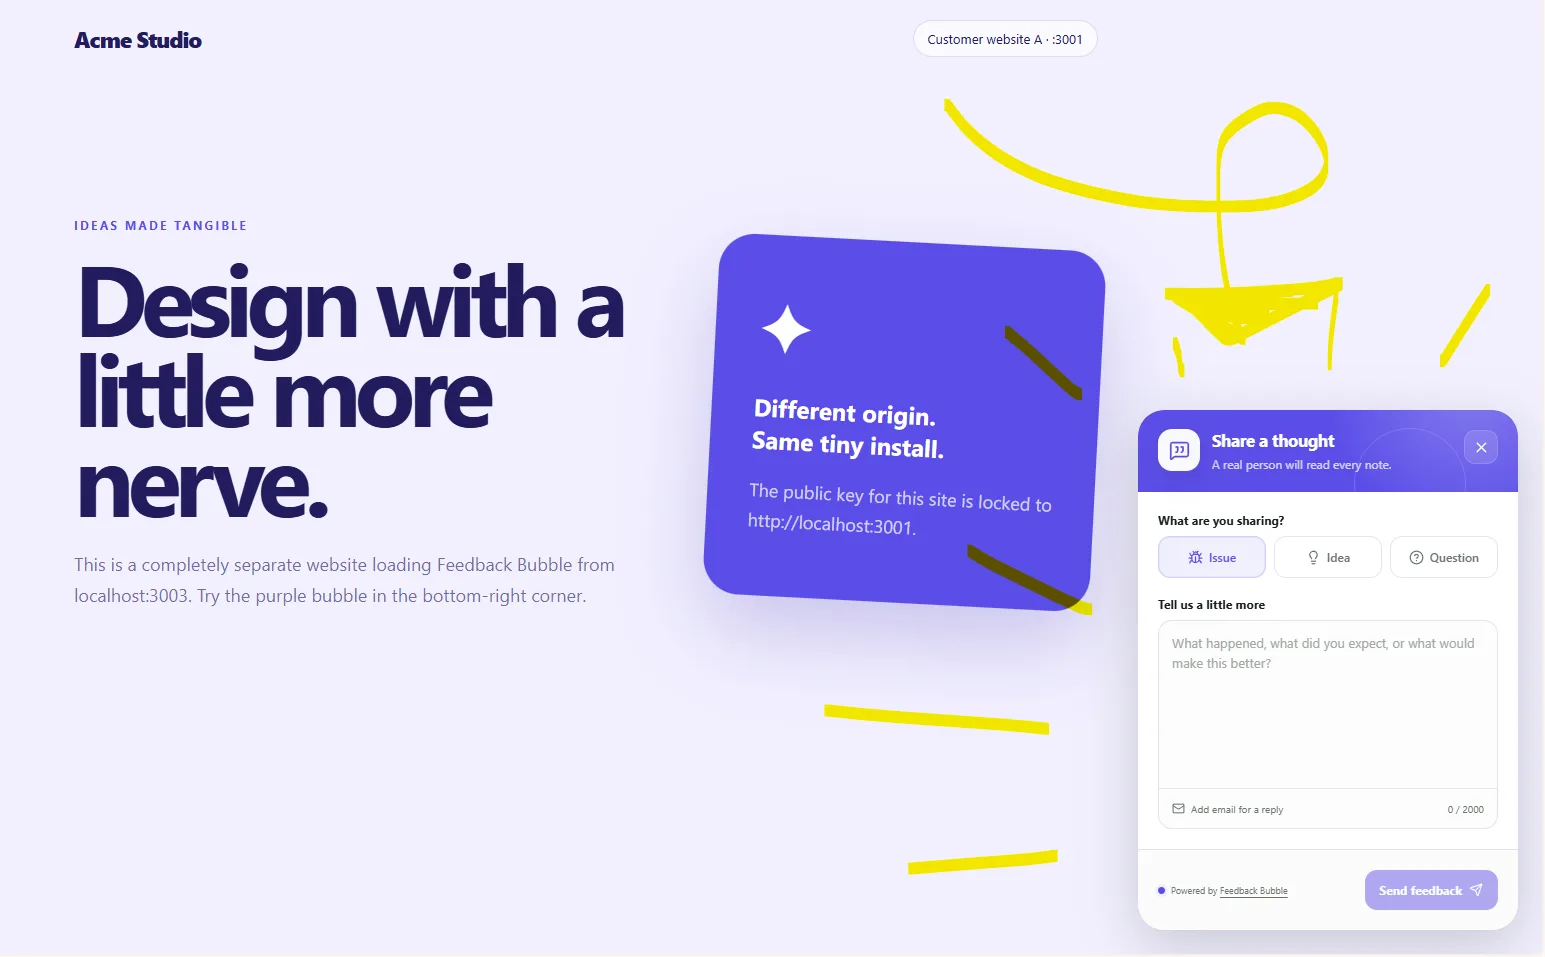
Adding a feedback button to your website takes less than an hour, and the basic approach is the same regardless of your stack: embed a small script or form, choose where the button sits on the page, and decide where incoming messages go. The harder part is making the button easy enough for visitors to actually use, and having a clear process for what happens to feedback once it arrives.
Why a feedback button is worth having on a SaaS product
When someone hits a bug, gets confused by a flow, or has an idea they want to share, most of them will not email you. They will leave, or quietly stop using the product. A visible feedback button gives that person a low-friction way to tell you something useful before they go.
For indie founders and solo developers, this matters even more than it does for large teams. You probably do not have a support team watching a shared inbox, a sales team taking calls, or a community forum surfacing what users actually think. A feedback button is often the most direct channel you have to find out what is working and what is not.
The feedback you collect this way is not a substitute for user interviews or usage analytics, but it fills a gap those methods miss. A session recording cannot tell you that a visitor found your pricing page confusing. An interview takes time to set up. A feedback button captures the thought in the moment, on the exact page where it occurred.
Four ways to add a feedback button to a website
There is no single right approach. The method that suits you depends on how much you want to build, where you want feedback to land, and what context you need alongside each message.
1. A mailto link styled as a button
The simplest option is an anchor tag with a mailto href, styled to look like a button. It costs nothing and requires no third-party script. The downside is that it opens the visitor's default email client, which many people find disruptive or simply do not have configured. You also get no context about which page the message came from, and replies land in your personal inbox alongside everything else.
2. A contact or feedback form
A dedicated feedback page with a form is a step up. Tools like Tally, Typeform, or a hand-built HTML form let you ask specific questions and collect email addresses. The main limitation is that the visitor has to leave the current page to fill it in, which adds enough friction to reduce completion. You also lose the context of which page they were on when they decided to send something.
3. A live chat widget repurposed for feedback
Some founders use a chat widget as a feedback channel. It works if you are online and able to respond, but async messages in a chat tool can feel odd if no one replies quickly. Chat tools are also built for conversations, not for triaging bug reports or grouping related feature requests. The workflow rarely transfers well to product decisions.
4. A floating feedback widget
A floating widget sits in a corner of the page and opens in place when a visitor clicks it. The visitor stays on the page, selects a feedback type, writes a message, and submits without navigating anywhere. This is the approach that captures the most context and causes the least friction, which is why it has become the common pattern on SaaS products.
What makes a feedback button actually useful
The design of the button matters less than the experience of using it. A few things reliably improve how much useful feedback you receive.
Keep it visible but unobtrusive.
A floating button in the bottom corner of the page is easy to find when needed and stays out of the way when it is not. Avoid hiding it behind a small icon with no label.
Separate the feedback types.
Asking visitors to choose between reporting a bug, suggesting a feature, or asking a question before they write anything helps you triage incoming messages without reading every one in full. It also signals to the visitor that their specific type of feedback is welcome.
Capture page context automatically.
If someone reports a bug, knowing the page URL, browser, operating system, and device type saves you several rounds of follow-up. This is particularly valuable for solo developers who cannot afford to spend time chasing down reproduction details.
Make email optional.
Requiring an email address before someone can submit feedback reduces the number of submissions you receive. Let visitors send feedback anonymously and offer the option to request a reply separately.
How to add a feedback button using Feedback Bubble
Feedback Bubble is a lightweight floating feedback widget built for indie founders, solo developers, and small SaaS teams. Installing it takes one script tag, and you can have it running on your site in a few minutes.
Step 1: Create your bubble
Once you have created an account and activated a subscription, go to Dashboard > Bubbles > New bubble. Give the bubble an internal name so you can identify it in the dashboard, and enter the full origin of the website where it will appear, for example https://www.yourdomain.com. The allowed website is a security restriction. Feedback Bubble checks the embedding origin before returning the widget configuration, so requests from unapproved domains are rejected.
Step 2: Customise the appearance and wording
The bubble editor has a live preview so you can see changes as you make them. You can set an accent colour, choose a launcher icon, pick a corner position, and set the theme to light, dark, or auto. Auto follows the visitor's colour preference, which is useful if your product supports both.
You can enable any combination of the three feedback types: Issue, Idea, and Question. Each type can be turned on or off independently, though at least one must remain active. If your product is in early access and you mainly want bug reports, you can disable Idea and Question until you are ready for those.
The form heading, supporting text, placeholder, and submit label are all editable. You can also customise the success message a visitor sees after submitting. These changes use the existing site key, so you do not need to reinstall the script after making them.
Step 3: Install the script
Go to Dashboard > Bubbles and select Install on the relevant bubble. The installation window shows separate tabs for HTML, Next.js, React, and WordPress. Each tab gives you a generated script containing the bubble's public site key.
HTML: Paste the script immediately before the closing </body> tag in your shared template.
React (Vite or Create React App): Paste the script before </body> in the root index.html.
Next.js: Open app/layout.tsx, import Script from next/script, and add the generated Script component inside <body> after your page content.
WordPress: Add the script to the theme's footer area or through a trusted header-and-footer plugin.
When the page loads, the script fetches the current bubble configuration, checks the origin against the approved domain, and adds the widget to the page. The floating button appears in the corner you selected in the editor.
What happens after feedback arrives
Installing the button is the easy part. A feedback button that sends messages into an unread folder provides no value. You need a simple process for what happens next.
New feedback lands in Dashboard > Inbox > Needs review. Each item shows the feedback type, the page and URL where it was submitted, and the browser and device context captured automatically. You can read it, filter by type, search across all messages, or bulk-select a set to act on.
From the inbox you have three main options for each message. Move it to Saved if it is useful but you are not ready to commit to it yet. Move it to Archive if it does not need further attention. Or connect it to a planned change if several related messages point to the same problem worth solving.
Planned changes in Feedback Bubble sit inside releases and move through Planned, Building, and Shipped stages. When a change ships, you can follow up directly with any visitors who left an email address and requested a reply.
Common mistakes when adding a feedback button
Treating every request as a build instruction
A feedback button surfaces what visitors think and feel in the moment. It does not tell you what to build. If five people request a feature, that is worth noting, but it does not automatically mean the feature belongs on your roadmap. Use the feedback as evidence to inform a decision, not as a directive.
Not checking it regularly
If you install the widget and then check the inbox once a month, you will miss the signal. Set up email notifications so you know when something arrives. In Feedback Bubble, new-feedback notifications are enabled by default and can be adjusted in Dashboard > Settings.
Asking too much of the visitor
If your feedback form asks for the browser version, reproduction steps, expected behaviour, and actual behaviour before allowing a submission, most people will close it. Capture the technical context automatically where possible, and let the visitor write a plain-text message. You can follow up for details if the message alone is not enough.
Running it on the wrong pages
A feedback button tends to be most valuable on the pages where visitors spend real time: your app dashboard, pricing page, or onboarding flow. It may be less relevant on a blog post or a public documentation page where visitors are reading rather than using the product.
Managing feedback across several websites
If you maintain more than one product or website, a single Feedback Bubble account can hold up to five bubbles, each with its own allowed domain, design, and wording. Feedback from all of them is visible in one inbox, and you can filter by bubble to focus on a specific site. This is useful for solo developers who build and maintain several small products at once without wanting to manage separate accounts.
A note on context versus conversation
Automatic page and device context reduces the number of follow-up questions you need to ask, but it does not replace a clear message from the visitor. If someone submits a bug report that says only "it doesn't work," knowing their browser and operating system still leaves you without enough information to reproduce it. Prompt clear messages through your form wording, and use the context as supporting detail rather than a substitute for the message itself.
Getting started
Adding a feedback button to your website is one of the lower-effort product improvements you can make as an indie founder. The technical side takes a few minutes. The more valuable investment is deciding in advance how you will read, organise, and act on what comes in, so that feedback becomes part of how you make product decisions rather than an inbox that fills up and gets ignored.
If you want to see how the widget looks and behaves before committing, the features page shows what the bubble editor and inbox look like in practice.
Frequently asked questions
Does a feedback button work on mobile as well as desktop?
A floating feedback widget should be responsive by design. Feedback Bubble's widget works across desktop and mobile and adapts to the visitor's colour preference automatically when set to auto theme.
Can visitors submit feedback without leaving the page they are on?
Yes, with a floating widget. The visitor opens the widget in place, writes a message, and submits it without navigating away. This is the main advantage of a floating button over a standalone feedback form on a separate page.
Do I need to update the installed script when I change the widget design?
Not normally. In Feedback Bubble, appearance and wording changes are loaded through the existing site key. You only need to reinstall the script if you generate a new bubble or if you change the allowed domain.
What if I have more than one website to collect feedback from?
One Feedback Bubble account supports up to five separate bubbles, each tied to a different domain. All incoming feedback is managed through the same inbox, which you can filter by bubble.
Should I require an email address from visitors who submit feedback?
Requiring an email address adds friction and will reduce the volume of feedback you receive. A better approach is to make email optional and offer visitors the chance to request a reply if they want one. That way you still hear from people who prefer to stay anonymous, and you can follow up with those who want a response.